How to Use Social Scheduler in PSW
This guide explains how to set up social accounts, create posts, schedule content, use the media library, monitor posts, and review reports inside Print Shop Worx.
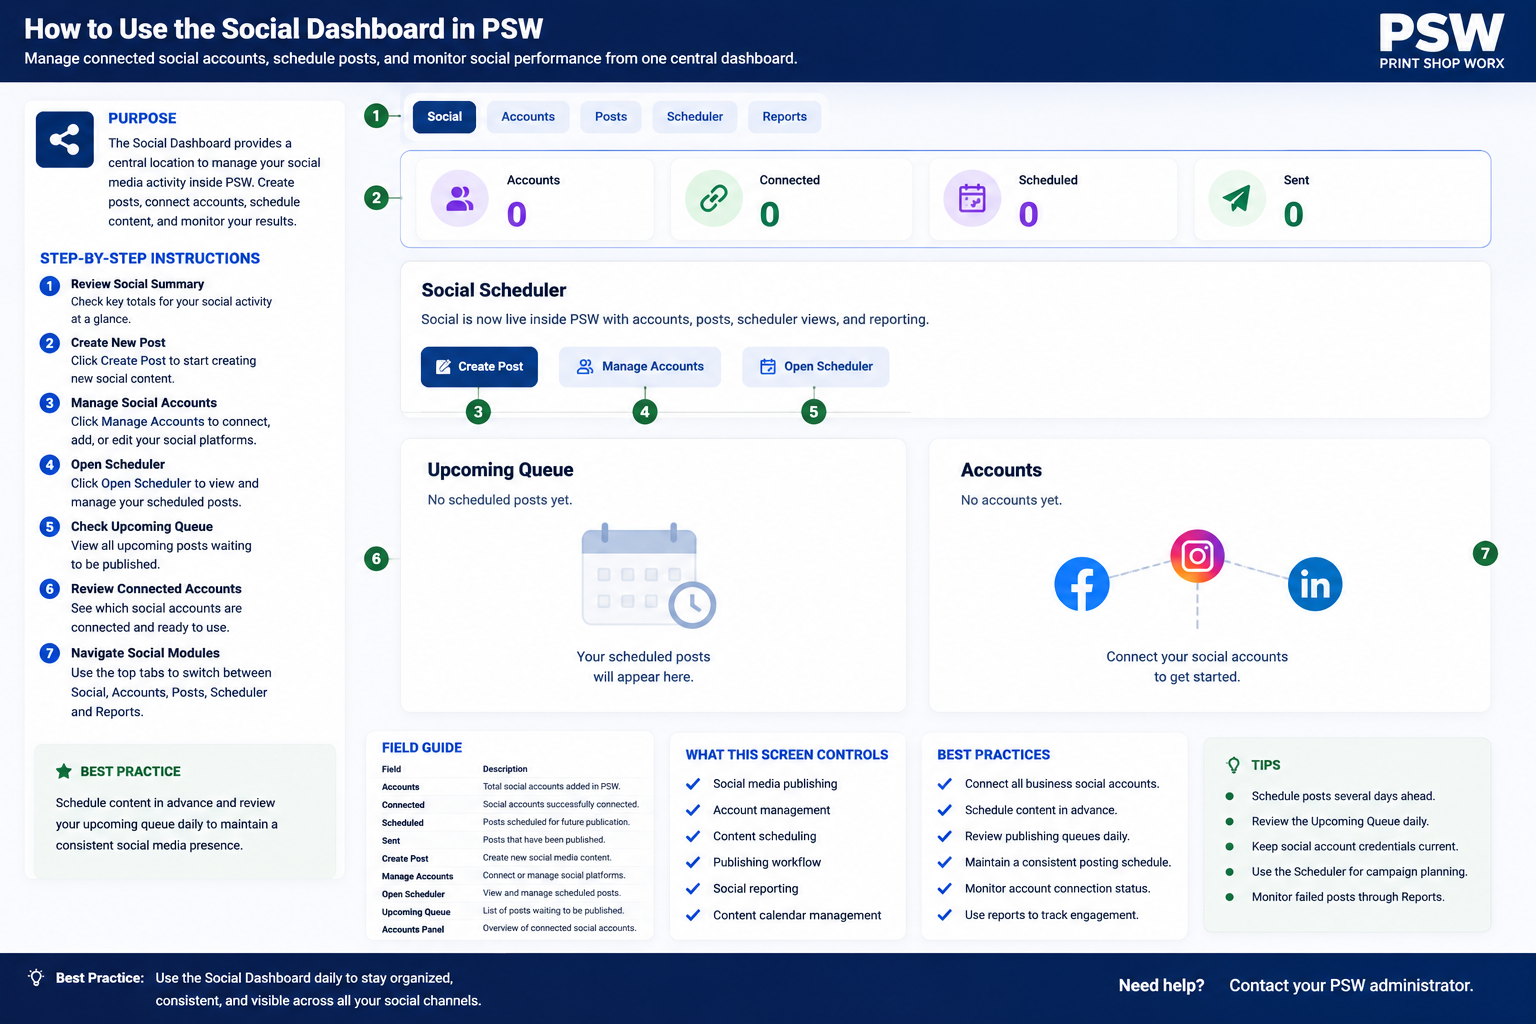
1. Social Dashboard overview
The Social Dashboard is the main starting point for social media inside PSW. It gives you quick access to accounts, posts, scheduler, media library, and reports.
Open Marketing
From the main app menu, click Marketing. Social sits under Marketing so everything related to campaigns and social content stays together.
Open Social Dashboard
Click Social Dashboard to view account counts, scheduled posts, sent posts, and quick actions.
Use the social tabs
Use the tabs for Social, Accounts, Posts, Scheduler, and Reports.
2. Add social media accounts to PSW
Social accounts must be added before you can schedule and publish posts. PSW separates accounts by platform so you can control where each post is sent.
Open Social Accounts
Go to Marketing > Social Accounts, or from the Social Dashboard click Manage Accounts.
Choose the platform
Select the platform you want to add, such as Meta/Facebook, Instagram, Threads, LinkedIn, or Test/Manual.
Connect or create manually
Use Connect where live account connection is available. Use Manual/Test when you want to plan content without live publishing.
Confirm publish readiness
After an account is added, check whether it is marked connected and publish ready before relying on scheduled posting.

| Field | What it means | What to check |
|---|---|---|
| Platform | The social network the account belongs to. | Choose the correct platform before saving. |
| Account name | The display name for the social account in PSW. | Use a clear name, such as Facebook Page or Instagram Business. |
| Connected | Shows whether PSW has a live connection or stored account record. | Reconnect if the account becomes disconnected. |
| Publish ready | Shows whether the account can be used for posting. | Only schedule live posts to publish-ready accounts. |
3. Upload and manage media
The Media Library stores reusable images and videos so you can attach them to posts without uploading the same file again each time.
Open Media Library
From Marketing > Social Posts, click Media Library, or open it from the social tools area.
Upload files
Click Choose File, select your image or video, then click Upload Media.
Check platform badges
Review badges such as safe for all platforms, may be cropped, or high crop risk before using media.
Reuse media in posts
When creating a post, select media from the library instead of uploading it again.

Recommended image size
Use square 1080 × 1080 images for broad compatibility across platforms.
Instagram portrait
Use 1080 × 1350 for Instagram feed posts where portrait layout is preferred.
File naming
Name media clearly, for example winter-promo-shirt.jpg or new-equipment-reel.mp4.
4. Create and manage social posts
The Posts screen is where you create new social content, review drafts, check scheduled posts, and manage posts that have been sent or failed.
Open Social Posts
Go to Marketing > Social Posts.
Click Create Post
Use Create Post to start a new draft.
Choose account targets
Select the social accounts/platforms where the post should be published.
Write the caption
Add your post text, hashtags, links, and any instructions for the person reviewing the content.
Attach media
Choose media from the Media Library or upload a new image/video if allowed.
Save or schedule
Save as draft, queue it, or schedule it for a specific date and time.

| Status | Meaning | Action |
|---|---|---|
| Draft | The post is saved but not ready to publish. | Review, edit, and schedule when ready. |
| Queued | The post is waiting in the publishing queue. | Check schedule time and target accounts. |
| Scheduled | The post is planned for a future date/time. | Monitor through Scheduler. |
| Sent | The post has been published or marked as sent. | Review performance in Reports. |
| Failed | The post did not publish successfully. | Check account connection, media, and retry. |
5. Use the Scheduler calendar
The Scheduler gives you a calendar view of your social content so you can plan campaigns, balance posting frequency, and avoid last-minute content creation.
Open Scheduler
Go to Marketing > Social Scheduler.
Select a month
Use the calendar controls to move between months or jump to a date.
Filter by status
Use filters to show scheduled, queued, sent, failed, or draft posts.
Create new content
Click New Post to create content directly from the schedule view.
Review gaps
Look for days or weeks with no content and add planned posts as needed.

6. Review social reports
Reports help you monitor activity, account readiness, scheduled posts, sent posts, and failed posts. Use reports to improve your content planning.
Open Reports
Go to Marketing > Social Reports or open the Reports tab from the Social area.
Check summary cards
Review total accounts, publish-ready accounts, scheduled posts, and failed posts.
Review failed posts
Failed posts should be checked quickly so account or media issues do not repeat.
Use results for planning
Use the reports to adjust posting frequency, campaign timing, and media choices.

7. Troubleshooting
Use this section when posts are not saving, not scheduling, or not publishing as expected.
| Issue | Likely cause | What to do |
|---|---|---|
| Cannot select an account | No social account has been added or the account is not publish ready. | Go to Social Accounts and connect or add the account first. |
| Post stays as draft | The post has not been scheduled or sent to the queue. | Open the post, choose schedule details, then save or queue it. |
| Post fails | Connection expired, media issue, or platform rule problem. | Reconnect the account, check media size, then retry. |
| Image looks cropped | The media does not match the preferred platform size. | Use Media Library badges and upload a safer crop. |
| Wrong platform selected | Target account was not reviewed before scheduling. | Edit the post before publish time and correct the target accounts. |
8. Setup checklist
Use this checklist when setting up Social Scheduler for the first time.